Friday, August 29, 2014

Siege Tower - Block In

I'm still working on blocking out the tower. The tower is designed with lost of details and it seems every board has a purpose. The interior isn't as well concepted out so I'm going to have to develope a lot of that myself. I'm predicting this step of the process will take some time, but since all the pieces are already UVed somewhat logically it will be a lot easier to texture.


Wednesday, August 27, 2014

5 Week Prop

We are working on this one for 5 weeks. It took me awhile to decide on what I wanted to do for a final prop since everything was open to us.

I finally decided on making this siege tower from Assassin's Creed. I didn't do this concept and all rights to it go to Ubisoft. I'm just using it as a reference to make a game prop for my portfolio.

I started by blocking out where my textures would go on a texture sheet for the prop. This is what I have. I'll fill in the space as I go if I find more props that need texturing.


I've blocked out the rough space it will take and now I'm starting to build the high poly.


The technique I'm using for this project, as far as planning out the textures first, is a technique that's used in environments frequently and I learned it from Digital Tutors. This is the specific tutorial http://www.digitaltutors.com/tutorial/857-Asset-Workflows-for-Modular-Level-Design


Wednesday, August 20, 2014

Portfolio Class - Dota 2 The Lunagia Blade - Day 5 - Turn In

All right, all done for now. The Lunagia Blade turned out to be 808 polygons. I went ahead and made all kinda of maps for it so I could plug it into lots of different rendering engines.

These are from Marmoset Toolbag 2.


These were done in UE4. The coloring is slightly different due to the lighting.


These final ones were done in Maya with a wireframe overlay comparison for the geometry.


Here is all the maps I generated.

Albedo/Diffuse


Speculare


Roughness


Gloss


Normal


Ambient Occlusion


 Metalness


 Emmisive


Portfolio Class - Dota 2 The Lunagia Blade - Day 4

Thanks to Kevin McCullen for a lot of great feedback. I've changed some of my design around extending the handle into a polearm weapon like a glaive. Although I was having an issue with the bake I found a work around and now I have my low poly with baked AO and normals.


The tutorial I'm going to be using this week to help me get quick edge scratches in photoshop is a freebie by 3D Motive.


Sunday, August 17, 2014

Portfolio Class - Dota 2 The Lunagia Blade - Day 2

I changed a few things about the design. Most noticable I added a bit of thickness and a second point to the end of the blade. The design felt a bit unbalanced with more visual weight on the hilt and none really on the blade.  I also shifted the blade almost flush with the right of the hilt.


I'm trying out some different colors here as well.

The weapon is now in Zbrush and I'm ready to start sculpting.

Saturday, August 16, 2014

Portfolio Class - Dota 2 The Lunagia Blade - Day 1

For the class I switched to making props this quarter so that I wont multiple scenes a quarter where one of them would have to suffer. Now I have more time to give both projects more attention. I also enjoy making props too.

So I decided to, for this project, mostly design my own Dota 2 weapon. I took a couple reference that I use more later when I get ready to texture. For now I just used them as inspiration and to get a feel of the overall style. I did silhouette, picked and slightly redesigned my favorite one and I'm starting to solve the design.


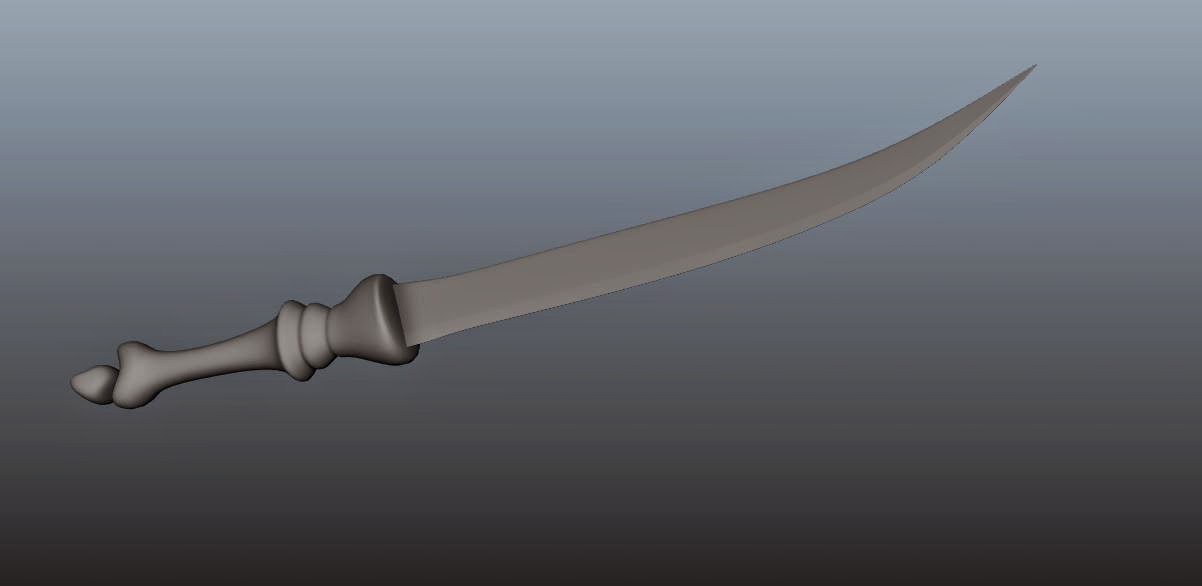
Before I went much further I decided making the high poly overall shape in Maya would help verify proportions on the weapon as I am not mainly a 2d artist. I tried to make it a bit thick and chunky, because that follows their weapon style a bit. I think it reads better on the characters in game when they are smaller on the screen.

This is day one.

Sunday, August 10, 2014

Portfolio Work - Environment - Futuristic Bar - Day 26

Quick update. Working on a new environment texture using the Quixel Suite. I'm watching the ZBrush summit for my tutorial this week.

Saturday, August 9, 2014

Portfolio Work - Environment - Futuristic Bar - Day 24

I'm happy that we get an extra week. I'm adding more details to the background. Tomorrow I will do a new lighting pass with the new details and start working on new materials. For now here is some of the new background work in maya.


Wednesday, August 6, 2014

Portfolio Work - Environment - Futuristic Bar - Day 21

Well there are still plenty more I want to work on in the scene. My three week sprint is up however and I've learned a few things. For one I'm going to try doing a base texture sheet for everything first then work on lighting, and then go back to finishing up the texturing.


Tuesday, August 5, 2014

Portfolio Work - Environment - Futuristic Bar - Day 20

I worked on the tables side texture,the stool texture and the bars speaker, but I'm not working fast enough to get this done in time. I'm going to have to come up with a new approach. I think I'm gonna try using a texture sheet to speed things up. Also I thing the light is a bit bright. To help with lighting I will watch this tutorial from digital tutors. http://www.digitaltutors.com/tutorial/1659-Introduction-to-Lighting-in-Unreal-Engine-4


Friday, August 1, 2014

Portfolio Work - Environment - Futuristic Bar - Day 16

The tutorial didn't really help too much with an image that still needs a lot of detail to look real, but I spent some time planning the shot. First pass lighting with some photoshop assistance is posted. Let's see how much can get done in the next couple of days.